Mostrando postagens com marcador Comments. Mostrar todas as postagens

domingo, 29 de julho de 2012

WordPress Fixed Floating Comment AnyTime Plugin

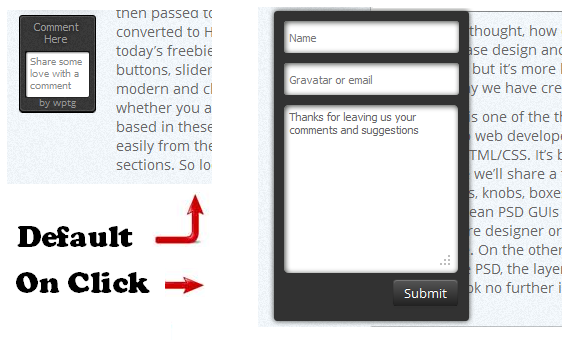
Green Round Chrome LogoThe floating share bars are very popular among bloggers.You know the bar the scrolls along beside posts as you read.These allow you to Tweet and Like the post at anytime.This is a very cool WordPress plugin that works with the same principle but for your comments.The floating comments plugin places a miniature comment form beside your posts that scrolls so readers can comment anytime.Once the reader clicks inside the comment field it opens with the options to add a comment.The comment form is then set so the page does not need to reload once the reader adds their comment so they can continue reading.

A Floating Comment Plugin For WordPress
Click Here To View Full Post >>

sábado, 14 de julho de 2012

Add A Fixed Jump To Comments Button In Blogger

Colorful Comments ImageGuest Post - Our host is Deepak Kamat, In this post he walks you through how to add a fixed jump to comments button on Blogger blogs.See How To Become a guest author on Spice Up Your Blog.

Comments are the major way of getting feedback about our blog posts from readers, therefore comments are really an essential part of any Blog. If you are a blogger too then your always delighted to see new comments on your posts.But there are times when you don't get any comments at all, often in long posts. The problem is that readers don't scroll through the whole page thus they miss the comment area.Even though people are reading your posts you are not getting any comments at all and it's frustrating.

So, how can you improve your site in a way that your blog post gets more comments and the comment form is easily accessible to readers?

This post covers this topic and tells you an easy and effective way of encouraging your readers to comment.The button will be fixed in the bottom right of the page, check out the demo.
Click Here To View Full Post >>

terça-feira, 19 de junho de 2012

Fix The Blogger Comment Form Message Below Threaded Comments Error On Blogger

Blogger Comment Bubble Logo iconThere have been a number of knock on effects to the recent addition of Threaded comment replies on Blogger.Basically some of the features that were available to the now old comment from no longer work or don't work in the same way.One of the things that changed since the addition of threaded comment reply option on Blogger is the 'Comment Form Message'.The comment form message for those not familiar with it is a message you can add above the comment from.Many bloggers used this to display some comment rules or a thanks for commenting message.

OK so what has happened - The comment form message is displayed above the comment form, however since the change to threaded comments once a comment is added the message moves to below the form.This in many ways defeats the purpose, people will be less likely to see the message below the comment form.Personally I add a message to subscribe to comments and this is Important as commenter's will be notified by Email when someone replies.

So whats the fix - There does not seem to be a direct fix for it but the guys at DuyPham have come up with a work around which I will show you below.

Move Comment Form Message Above Comments

Click Here To View Full Post >>

quinta-feira, 7 de junho de 2012

Three Color Styles For Blogger Threaded Comments With Author Comments Highlighted

The ability to reply to comments on Blogger was probably the most sought after feature from Blogger users from many years.This year when the Blogger team delivered with the new Threaded comments with replies the response was obviously very positive.However the new comment format has brought with it some problems as some previous changes you may have made to your comment section may have been lost and moreover future changes would need to be coded differently.So for those of you that may have lost some of the styles you added or if you just want to add some style to lets face it what is a fairly basic looking comment section in this post i have 3 different color coded styles you can easily add to your blogger comments.Also check out the Speech Bubble Style Threaded Comments For Blogger we published in April.

The three styles add color to the comment number, comment author name, add a comment text and best of all the author comments have a ribbon attached.So when you comment on your own blog a ribbon will be placed in the corner with the text "Author" so reader can easily see your comments.The three styles we have will add all these features including the author ribbon in either Blue, Pink or Green.

These styles have been influenced from the code on Duypham, check out the demo below (Scroll to comments) with the blue style added.

View Demo Button

I have a tutorial on how to add the code to your blog and of course the code for all three styles.

Three Styles For Blogger Threaded Comments

Click Here To View Full Post >>

Three Color Styles For Blogger Threaded Comments With Author Comments Highlighted

The ability to reply to comments on Blogger was probably the most sought after feature from Blogger users from many years.This year when the Blogger team delivered with the new Threaded comments with replies the response was obviously very positive.However the new comment format has brought with it some problems as some previous changes you may have made to your comment section may have been lost and moreover future changes would need to be coded differently.So for those of you that may have lost some of the styles you added or if you just want to add some style to lets face it what is a fairly basic looking comment section in this post i have 3 different color coded styles you can easily add to your blogger comments.Also check out the Speech Bubble Style Threaded Comments For Blogger we published in April.

The three styles add color to the comment number, comment author name, add a comment text and best of all the author comments have a ribbon attached.So when you comment on your own blog a ribbon will be placed in the corner with the text "Author" so reader can easily see your comments.The three styles we have will add all these features including the author ribbon in either Blue, Pink or Green.

These styles have been influenced from the code on Duypham, check out the demo below (Scroll to comments) with the blue style added.

View Demo Button

I have a tutorial on how to add the code to your blog and of course the code for all three styles.

Three Styles For Blogger Threaded Comments

Click Here To View Full Post >>

domingo, 15 de abril de 2012

Add Cool Css Speech Bubbles To The New Blogger Threaded Comments

Blogger Threaded Comments Style
Blogger introduced Threaded comment replies to all blogger blogs early in January 2012.The option to reply directly to comments on Blogger was one of the most popular requests by Blogger users.So a great update but the style of the default blogger comments is still quiet bland.In this post we have a tutorial to add some style to Blogger comments.The Css styles we are adding places the comments in a rounded speech bubble with an arrow to the authors avatar, the reply link is also highlighted.Take a look at the demo below, scroll to the comments..

View Demo Button

This tutorial comes courtesy of the great Noct blog, make sure to check them out.Lets add some style to your blogs comments.

Add Css Styles To Blogger Threaded Comments

Click Here To View Full Post >>

terça-feira, 17 de janeiro de 2012

Blogger Threaded Comments Errors And Tutorials

Blogger Logo Icon
Last week the Blogger team introduced threaded comment replies, since then there has been a number of issues.Many of these issues can be easily resolved while there are one or two that are currently being worked on.If your still having trouble implementing threaded comments on your blog check out the tutorials from Harish on way2blogging - Tutorial - Video Tutorial.

Posts Jumping Directly To Comment Form

Click Here To View Full Post >>

quinta-feira, 12 de janeiro de 2012

How To Add The New Reply Button To Blogger Comments With Threaded Replies

Blogger Comment Logo Gold
One of the most popular posts on Spice Up Your Blog over the last few years has been "How to add comment replies to your blog".While that tutorial was a valid option to allow readers to reply to comments it did not place the reply to each comment in a threaded fashion.In fact many of the comments on that post asked was it possible to have the reply placed under the original comment.After so many many requests the Blogger Team have taken note and today Threaded comment replies are now available on Blogger.You can see on our comment form below comment have a reply button and the replies are placed below the original comment.

How to activate comment replies on Blogger

Click Here To View Full Post >>

sexta-feira, 15 de julho de 2011

An Updated Look At Do-Follow And No-Follow Comments

In January 2010 i published what has become the most popular Search Engine Optimization (SEO) posts on Spice Up Your Blog (SUYB).The post titled 'Building Backlinks, Do-Follow Comments And Information To Increase Google Search Rank And Page Rank' has consistently been in the top 10 in terms of views and to date has 117 comments.I guess the reason it has been so popular is it covers a number of topics related to improving your blogs performance in search, especially Google.The original intention of the post was to explain Do-Follow comments, what they are and how they work.I wont explain the whole do-follow process again you can check out the post linked above for more on the subject.

To explain Do-Follow i ended up covering why Back Links are so important and the whole Back Link process.The points covered in the post are still valid and i stand behind the information but in the 19 months since published some of my personal opinions have changed.In this post i want to explain how my opinions especially of Do-Follow comments have changed.

To Follow Or Not To Follow


At the time of writing that post Spice Up Your Blog had Do-Follow comments.I have since switched the comments back to no-follow in an effort to reduce spam which was getting out of control.I said in the post i thought Do-Follow comments would help build a community.While i still think this is valid for a new blog or growing blog once you blog is established it becomes less feasible.

At the moment i receive about 10-20 spam comments every day along with 20-30 valid comments.If the SUYB comments were still do-follow the spam number could grow towards 100 daily.I simply don't have the time to sort through this and that is the reason i switched back to no-follow.If you think this is a bit of an exaggeration check out the article by Web Pro News on how professional SEO company's actually pay people to work full time leaving comments on blogs - Why SEO Disgusts Me.

Another piece of advice i gave in that post was to use the Name URL format when leaving a comment.This would mean when published your name beside your comment is a direct link to your blog.I would still recommend this were possible but unfortunately i have had to switch this option off on SUYB.The reason for switching it off is because this also opens up the comment as Anonymous option.Once again as SUYB has grown some fools have found it entertaining to leave whats best called rude comments.I'm sure you have seen the types that spend their sad lonely existence on places like YouTube commenting on every video just to say how 'F***ing S**t' it is.

I guess to sum up my opinion has changed over the last 19 months as far as my own blogs are concerned.Taking both these steps (i only turned off the Name URL and Anonymous comments last week) has seen a serious decline in spam.But if you are trying to entice comments maybe on a new blog do follow comments are something to consider.

Drop Your Comments And Questions Below.

segunda-feira, 4 de julho de 2011

Add An Admin Badge Plus Differant Style Colors To Author Comments On Blogger

Admin comments badge and style on bloggerIn the comments here on Spice Up Your Blog when i as the admin or author, post a comment in the bottom corner there is a sparkling animated badge with the word 'Admin'.I have received so many requests to cover this in a tutorial so today i will show you how it's done.OK so back in April i published a post showing how to use different colors on the authors or admin comments on Blogger and we actually use the very same technique here but this time with a background image.While i will give you the URL for the admin badge i have been using and everyone seems to like so much you can use any image.

Now while we are adding the admin badge or image we might as well add some more styles to the author comments so they stand out, it does not require any extra work so why not.To that end i have also included the Css for your comments to have a different background color, Different border color and the border will have rounded corners.Lets look at the demo :
Click Here To View Full Post >>

domingo, 15 de maio de 2011

Remove The White Space Gap Below Blogger Comment Form

remove gap space below blogger commentsA question i was asked this week was 'I notice a big empty gap below the comment form on my blog.There is a big space between the comment form and the older posts, home and newer posts links, is there a way to remove it ?'.The problem is in the size given to the iframe for the comment form and you can indeed remove the space by making the iframe smaller.We simply find the code for the comment form iframe and make a quick change, couldn't be easier.
Click Here To View Full Post >>

domingo, 24 de abril de 2011

Display A Default Avatar Image For Anonymous Comments On Blogger

In the comments for my Recent Post about the New Blogger Design And Dashboard Going Live Ahmad Nuzul Asked "Can u make a post on how to make a custom avatar for anonymous comments? Thanks.".

No Problem !  In this post i will show you how you can have a default image appear as the Avatar Thumbnail for comments not only by anonymous commenter's but also for comments left using some of the other log in options or people that have no Image Uploaded to their Blogger / Google account.
Click Here To View Full Post >>

Display A Default Avatar Image For Anonymous Comments On Blogger

In the comments for my Recent Post about the New Blogger Design And Dashboard Going Live Ahmad Nuzul Asked "Can u make a post on how to make a custom avatar for anonymous comments? Thanks.".

No Problem !  In this post i will show you how you can have a default image appear as the Avatar Thumbnail for comments not only by anonymous commenter's but also for comments left using some of the other log in options or people that have no Image Uploaded to their Blogger / Google account.
Click Here To View Full Post >>

terça-feira, 19 de abril de 2011

Use A Cool Envelope Background Image On Your Blogger Comments


In this post we are going to see how to add a really cool envelope image behind your Blog Comment Form.The envelope image will blend in with the comment form itself along with the Post A Comment Message, Post Comment and Preview Buttons and subscribe by email link.The image is grey with a nice design in the top left and a small icon will be below the subscribe by Email link users click to be notified of replies.
Click Here To View Full Post >>

Use A Cool Envelope Background Image On Your Blogger Comments


In this post we are going to see how to add a really cool envelope image behind your Blog Comment Form.The envelope image will blend in with the comment form itself along with the Post A Comment Message, Post Comment and Preview Buttons and subscribe by email link.The image is grey with a nice design in the top left and a small icon will be below the subscribe by Email link users click to be notified of replies.
Click Here To View Full Post >>

segunda-feira, 4 de abril de 2011

Updated Add Colors And Hover Effect To Authors Comments On Blogger

blogger commentsBack In January 2010 i wrote a post showing you how to use a different background color and text color on comments by the blogs author.This is a great way for readers to quickly find comments you make on your blog such as replies or extra information.That code has since become somewhat outdated so i have been working on a new more advanced code.

This week you may have noticed i have being trying out the code on the comments this blog.As with before the authors comments will have a different background color and text color but i have added a few more features.The background color will also have rounded corners and the colors will change when users hover their cursor over the comment.


Video Post - For Extra Help I have A Video Tutorial At The End Of the Post.

Author Comments Screenshot


You can see my comments have a different background and font color.I have set my comments to have a black background with White text.I also have a hover effect so with the cursor over the second comment the color changes to a Grey background with White text.

blogger comments

I have used black and white (Grey And Black On Hover) but you can use any colors you like to suit your template.

This tutorial does include making changes within section of code so make sure to back up your template and take your time.

Add Colored Author Comments To Your Blog


Step 1. In your Blogger dashboard click > Design > Edit Html > Tick The Expand Widget Templates Box :

Design Edit Html Widget Templates

Step 2. Find the following piece of code in your blogs Html : (Click Ctrl and F for a search bar to help find the code - More Info)

]]></b:skin>

Step 3. Copy and Paste the following code directly Above / Before ]]></b:skin>

.comment-body-author {
-moz-border-radius: 15px;
border-radius: 15px;
background: #000000; /* BG color*/
color: #ffffff; /* Font color*/
border-top: 1px dotted #223344;border-bottom: 1px dotted #223344;border-left: 1px dotted #223344;border-right: 1px dotted #223344;
margin:0;
padding:0 0 0 20px;
}

.comment-body-author:hover {
-moz-border-radius: 15px;
border-radius: 15px;
background: #cccccc; /* BG Hover color*/
color: #000000; /* Font Hover color*/
border-top: 1px solid #990000;border-bottom: 1px solid #990000;border-left: 1px solid #990000;border-right: 1px solid #990000;
margin:0;
padding:0 0 0 20px;
}

Note - The colors (Hex) are highlighted in red above and can be changed.To get the Hex code for the colors you want go to this chart - Hex Code Color Chart.

Step 4. Save Your Template, But we are not finished.

In the next step you need to find a section of code in your template and add two extra snippets of code to it.When testing this i found older and custom Blogger templates are different to templates from the Blogger templates designer.For that reason i have two separate methods.The first is for people with Blogger templates that are not from the template designer the second is for templates from the template designer....Got It ....

Users With Custom And Older Blogger Templates Follow These Steps


Step 1. Now we need to edit the following section of code in your template.Finding a section of code can be hard so the best way is to find the first line (Use The Ctrl F Search Method) and work from there.If you cant find the first line look for the second line, remember Blogger templates can have different code so it might not look exactly the same.

<dd class='comment-body'>
<b:if cond='data:comment.isDeleted'>
<span class='deleted-comment'><data:comment.body/></span>
<b:else/>
<p><data:comment.body/></p>
</b:if>
</dd>

Step 2. OK you have located the section of code, we now add two snippets of code to it.You can see the two snippets and were i have added them below in red.

<b:if cond='data:comment.author == data:post.author'>
<dd class='comment-body-author'>
<p><data:comment.body/></p>
</dd>
<b:else/>

<dd class='comment-body'>
<b:if cond='data:comment.isDeleted'>
<span class='deleted-comment'><data:comment.body/></span>
<b:else/>
<p><data:comment.body/></p>
</b:if>
</dd>

</b:if>

<dd class='comment-footer'>
<span class='comment-timestamp'>
<a expr:href='"#comment-" + data:comment.id' title='comment permalink'>
<data:comment.timestamp/>
</a>
<b:include data='comment' name='commentDeleteIcon'/>
</span>
</dd>
</b:loop>
</dl>

Step 3. Once your happy you have the code in the right place you can save your template and check it out.

Users With Templates From The Template Designer Follow These Steps


Step 1. Now we need to edit the following section of code in your template.Finding a section of code can be hard so the best way is to find the first line (Use The Ctrl F Search Method) and work from there.If you cant find the first line look for the second line, remember Blogger templates can have different code so it might not look exactly the same.

<dd class='comment-body' expr:id='data:widget.instanceId + data:comment.cmtBodyIdPostfix'>
<b:if cond='data:comment.isDeleted'>
<span class='deleted-comment'><data:comment.body/></span>
<b:else/>
<p>
<data:comment.body/>
</p>
</b:if>
</dd>

Step 2. OK you have located the section of code, we now add two snippets of code to it.You can see the two snippets and were i have added them below in red.

<b:if cond='data:comment.author == data:post.author'>
<dd class='comment-body-author'>
<p><data:comment.body/></p>
</dd>
<b:else/>

<dd class='comment-body' expr:id='data:widget.instanceId + data:comment.cmtBodyIdPostfix'>
<b:if cond='data:comment.isDeleted'>
<span class='deleted-comment'><data:comment.body/></span>
<b:else/>
<p>
<data:comment.body/>
</p>
</b:if>
</dd>

</b:if>

<dd class='comment-footer'>
<span class='comment-timestamp'>
<a expr:href='data:comment.url' title='comment permalink'>
<data:comment.timestamp/>
</a>
<b:include data='comment' name='commentDeleteIcon'/>
</span>
</dd>
</b:loop>
</dl>
</div>

Step 3. Once your happy you have the code in the right place you can save your template and check it out.


We have lots more tips for your Blog Comments.

Drop Your Comments And Questions Below.

Updated Add Colors And Hover Effect To Authors Comments On Blogger

blogger commentsBack In January 2010 i wrote a post showing you how to use a different background color and text color on comments by the blogs author.This is a great way for readers to quickly find comments you make on your blog such as replies or extra information.That code has since become somewhat outdated so i have been working on a new more advanced code.

This week you may have noticed i have being trying out the code on the comments this blog.As with before the authors comments will have a different background color and text color but i have added a few more features.The background color will also have rounded corners and the colors will change when users hover their cursor over the comment.


Video Post - For Extra Help I have A Video Tutorial At The End Of the Post.

Author Comments Screenshot


You can see my comments have a different background and font color.I have set my comments to have a black background with White text.I also have a hover effect so with the cursor over the second comment the color changes to a Grey background with White text.

blogger comments

I have used black and white (Grey And Black On Hover) but you can use any colors you like to suit your template.

This tutorial does include making changes within section of code so make sure to back up your template and take your time.

Add Colored Author Comments To Your Blog


Step 1. In your Blogger dashboard click > Design > Edit Html > Tick The Expand Widget Templates Box :

Design Edit Html Widget Templates

Step 2. Find the following piece of code in your blogs Html : (Click Ctrl and F for a search bar to help find the code - More Info)

]]></b:skin>

Step 3. Copy and Paste the following code directly Above / Before ]]></b:skin>

.comment-body-author {
-moz-border-radius: 15px;
border-radius: 15px;
background: #000000; /* BG color*/
color: #ffffff; /* Font color*/
border-top: 1px dotted #223344;border-bottom: 1px dotted #223344;border-left: 1px dotted #223344;border-right: 1px dotted #223344;
margin:0;
padding:0 0 0 20px;
}

.comment-body-author:hover {
-moz-border-radius: 15px;
border-radius: 15px;
background: #cccccc; /* BG Hover color*/
color: #000000; /* Font Hover color*/
border-top: 1px solid #990000;border-bottom: 1px solid #990000;border-left: 1px solid #990000;border-right: 1px solid #990000;
margin:0;
padding:0 0 0 20px;
}

Note - The colors (Hex) are highlighted in red above and can be changed.To get the Hex code for the colors you want go to this chart - Hex Code Color Chart.

Step 4. Save Your Template, But we are not finished.

In the next step you need to find a section of code in your template and add two extra snippets of code to it.When testing this i found older and custom Blogger templates are different to templates from the Blogger templates designer.For that reason i have two separate methods.The first is for people with Blogger templates that are not from the template designer the second is for templates from the template designer....Got It ....

Users With Custom And Older Blogger Templates Follow These Steps


Step 1. Now we need to edit the following section of code in your template.Finding a section of code can be hard so the best way is to find the first line (Use The Ctrl F Search Method) and work from there.If you cant find the first line look for the second line, remember Blogger templates can have different code so it might not look exactly the same.

<dd class='comment-body'>
<b:if cond='data:comment.isDeleted'>
<span class='deleted-comment'><data:comment.body/></span>
<b:else/>
<p><data:comment.body/></p>
</b:if>
</dd>

Step 2. OK you have located the section of code, we now add two snippets of code to it.You can see the two snippets and were i have added them below in red.

<b:if cond='data:comment.author == data:post.author'>
<dd class='comment-body-author'>
<p><data:comment.body/></p>
</dd>
<b:else/>

<dd class='comment-body'>
<b:if cond='data:comment.isDeleted'>
<span class='deleted-comment'><data:comment.body/></span>
<b:else/>
<p><data:comment.body/></p>
</b:if>
</dd>

</b:if>

<dd class='comment-footer'>
<span class='comment-timestamp'>
<a expr:href='"#comment-" + data:comment.id' title='comment permalink'>
<data:comment.timestamp/>
</a>
<b:include data='comment' name='commentDeleteIcon'/>
</span>
</dd>
</b:loop>
</dl>

Step 3. Once your happy you have the code in the right place you can save your template and check it out.

Users With Templates From The Template Designer Follow These Steps


Step 1. Now we need to edit the following section of code in your template.Finding a section of code can be hard so the best way is to find the first line (Use The Ctrl F Search Method) and work from there.If you cant find the first line look for the second line, remember Blogger templates can have different code so it might not look exactly the same.

<dd class='comment-body' expr:id='data:widget.instanceId + data:comment.cmtBodyIdPostfix'>
<b:if cond='data:comment.isDeleted'>
<span class='deleted-comment'><data:comment.body/></span>
<b:else/>
<p>
<data:comment.body/>
</p>
</b:if>
</dd>

Step 2. OK you have located the section of code, we now add two snippets of code to it.You can see the two snippets and were i have added them below in red.

<b:if cond='data:comment.author == data:post.author'>
<dd class='comment-body-author'>
<p><data:comment.body/></p>
</dd>
<b:else/>

<dd class='comment-body' expr:id='data:widget.instanceId + data:comment.cmtBodyIdPostfix'>
<b:if cond='data:comment.isDeleted'>
<span class='deleted-comment'><data:comment.body/></span>
<b:else/>
<p>
<data:comment.body/>
</p>
</b:if>
</dd>

</b:if>

<dd class='comment-footer'>
<span class='comment-timestamp'>
<a expr:href='data:comment.url' title='comment permalink'>
<data:comment.timestamp/>
</a>
<b:include data='comment' name='commentDeleteIcon'/>
</span>
</dd>
</b:loop>
</dl>
</div>

Step 3. Once your happy you have the code in the right place you can save your template and check it out.


We have lots more tips for your Blog Comments.

Drop Your Comments And Questions Below.

quinta-feira, 16 de dezembro de 2010

New Script Add Images And Colored Text To Blogger Comments

images in blogger commentsIn this post Macro Raman shares a fantastic script he created that allows people for the first time to add images, different color text and scrolling text to comments on Blogger.Here on Spice Up Your Blog we have made great strides in improving the Blogger comments with tricks like Adding Replies To Blogger Comments and Adding Smileys and Emoticons to Blogger Comments.This script will bring the comments on your blog to another level allowing readers to use different colors, share images and just for fun use Marquee scrolling text when they comment.

Live Demo - Click To See The Demo : Blogger Comment Images And Colors

Macro writes his blog in Tamil but has done a great job in Writing this post in English to share his new script with Spice Up Your Blog Readers.I will summarise the steps and show you how to add a message above the comment form to let readers know of the options below Macro's post.

Note - This post and script can not be republished on other blogs by request of Author, if you want to share this you may link to this post.

New Blogger Scrip Display Images And Colors In Comments


Guest Post - By Macro Raman

We do see many of them chats with shorten words, symbols, smileys and more to tell in short form. Now its a time of zero typing where image speaks a lot more than words. Let us imagine there is a colorful animated new year greeting post where you like to greet the author the same way.You know greeting pictures speak Louder than words,so you too created a splendor greeting picture for the blog author but the blog restrict you to post images. Then?

Of course, Blogger.com restrict the readers to post images in their comments column.We know It is possible to posts picture comment in wordpress blogs by adding just <img> tags. then what is the solution for the blogger's blogspot? Here I introduce new javascript which try to minimize the maximum extend of this restriction. and be aware of it that it doesn't work in script disabled browsers.

How to add image?

This is just simple, you need to start with [im] and end with [/im] place your image address in between of it.Like This :

[im]http://domain.com/folder/sample.jpg[/im]


How to install?

This is the code

<a href='http://www.spiceupyourblog.com'><img alt='Best Blogger Tips' src='https://blogger.googleusercontent.com/img/b/R29vZ2xl/AVvXsEj-IlJVzvSCVVSsiCqqQ5Bn4soziCBcd7DetVFsPvbjCMRJ136yeOqY41CdMZtj3Bmb2_OwWRCin7zuIs-dxw9tyc2fitpdO8ZFi2IccLjOnhdWkFxtY-8y6mryCktW5nJpQbhnIa-_1ZaB/s1600/best+blogger+tips.png'/></a><script src='http://hosting.gmodules.com/ig/gadgets/file/105066904960012479556/nccode.js' type='text/javascript'/><a href="http://www.spiceupyourblog.com">Best Blogger Tips</a>

which you need to paste it before </body> in the source code of blogspot or any blogger's website.

That's it The Script take care of it, and don't forget to tell to your readers about picture comments.

What more ?

Do you need more colorful comments? then use :

[ma]....your text...[/ma]
for marquee effect i.e. running letters.

[co="red"]...your text...[/co]
for red colored text. you can change the color as your wish.You can try this code and add what you feel, if you agree.

Summary And Message Above Comments


Add The Script To Your Blog

Step 1. Click Design > Edit Html


Step 2. Find the following piece of code in your blogs Html : (Click Ctrl and F for a search bar to help find the code - More Info)

</body>

Step 3. Copy And Paste The Following Code Directly Below / Under </body>

<script src='http://hosting.gmodules.com/ig/gadgets/file/105066904960012479556/nccode.js' type='text/javascript'/><a href="http://www.spiceupyourblog.com">Best Blogger Tips</a>

-To add an image to a comment wrap it in [im][/im] like this :

[im]Image URL Here[/im]

-To Change Color Of Text In Comment Wrap It In [co="color"][/co] Like This :

[co="red"]Comment Text Here[/co] - Change Red To The Color You Want.

-To Add Marquee Text Wrap It In [ma][/ma] Like This :

[ma]Comment Text[/ma]

Add Message Above Comment Form


You will want to let your readers know the options so below i will show you how to add a message above the comment form.You can see the message we are adding on the demo.

Step 1. In your Blogger Dashboard click > Design > Edit Html > Expand Widget Templates :


Step 2. Find the following piece of code in your blogs Html : (Click Ctrl and F for a search bar to help find the code - More Info)

<p><data:blogCommentMessage/></p>

Step 3. Copy And Paste The Code Below Directly After <p><data:blogCommentMessage/></p>

<a href='http://www.spiceupyourblog.com'><img alt='Best Blogger Tips' src='https://blogger.googleusercontent.com/img/b/R29vZ2xl/AVvXsEj-IlJVzvSCVVSsiCqqQ5Bn4soziCBcd7DetVFsPvbjCMRJ136yeOqY41CdMZtj3Bmb2_OwWRCin7zuIs-dxw9tyc2fitpdO8ZFi2IccLjOnhdWkFxtY-8y6mryCktW5nJpQbhnIa-_1ZaB/s1600/best+blogger+tips.png'/></a><b>Comment Options -</b> You Can Add Images, Colored Text And Marquee Text To Your Comment.<br/><br/><b>Image -</b> [im]Image URL Here[/im]<br/><b>Colors - </b>[co="red"]Comment Text Here[/co] - Change Red To The Color You Want.<br/><b>Marquee -</b> [ma]Comment Text[/ma]<br/><b>Get This -</b> <a href="http://www.spiceupyourblog.com/2010/12/images-colored-text-blogger-comments.html" target="_blank">Blogger Comment Script</a><br/>

Save Your Template and your readers will now know all the options they have.


guest blog postAuthor - Macro is a Blogger And Designer, he created this script and wanted to share with Spice Up Your Blog Readers.You can find Macro on his Blog.


New Script Add Images And Colored Text To Blogger Comments

images in blogger commentsIn this post Macro Raman shares a fantastic script he created that allows people for the first time to add images, different color text and scrolling text to comments on Blogger.Here on Spice Up Your Blog we have made great strides in improving the Blogger comments with tricks like Adding Replies To Blogger Comments and Adding Smileys and Emoticons to Blogger Comments.This script will bring the comments on your blog to another level allowing readers to use different colors, share images and just for fun use Marquee scrolling text when they comment.

Live Demo - Click To See The Demo : Blogger Comment Images And Colors

Macro writes his blog in Tamil but has done a great job in Writing this post in English to share his new script with Spice Up Your Blog Readers.I will summarise the steps and show you how to add a message above the comment form to let readers know of the options below Macro's post.

Note - This post and script can not be republished on other blogs by request of Author, if you want to share this you may link to this post.

New Blogger Scrip Display Images And Colors In Comments


Guest Post - By Macro Raman

We do see many of them chats with shorten words, symbols, smileys and more to tell in short form. Now its a time of zero typing where image speaks a lot more than words. Let us imagine there is a colorful animated new year greeting post where you like to greet the author the same way.You know greeting pictures speak Louder than words,so you too created a splendor greeting picture for the blog author but the blog restrict you to post images. Then?

Of course, Blogger.com restrict the readers to post images in their comments column.We know It is possible to posts picture comment in wordpress blogs by adding just <img> tags. then what is the solution for the blogger's blogspot? Here I introduce new javascript which try to minimize the maximum extend of this restriction. and be aware of it that it doesn't work in script disabled browsers.

How to add image?

This is just simple, you need to start with [im] and end with [/im] place your image address in between of it.Like This :

[im]http://domain.com/folder/sample.jpg[/im]


How to install?

This is the code

<a href='http://www.spiceupyourblog.com'><img alt='Best Blogger Tips' src='https://blogger.googleusercontent.com/img/b/R29vZ2xl/AVvXsEj-IlJVzvSCVVSsiCqqQ5Bn4soziCBcd7DetVFsPvbjCMRJ136yeOqY41CdMZtj3Bmb2_OwWRCin7zuIs-dxw9tyc2fitpdO8ZFi2IccLjOnhdWkFxtY-8y6mryCktW5nJpQbhnIa-_1ZaB/s1600/best+blogger+tips.png'/></a><script src='http://hosting.gmodules.com/ig/gadgets/file/105066904960012479556/nccode.js' type='text/javascript'/><a href="http://www.spiceupyourblog.com">Best Blogger Tips</a>

which you need to paste it before </body> in the source code of blogspot or any blogger's website.

That's it The Script take care of it, and don't forget to tell to your readers about picture comments.

What more ?

Do you need more colorful comments? then use :

[ma]....your text...[/ma]
for marquee effect i.e. running letters.

[co="red"]...your text...[/co]
for red colored text. you can change the color as your wish.You can try this code and add what you feel, if you agree.

Summary And Message Above Comments


Add The Script To Your Blog

Step 1. Click Design > Edit Html


Step 2. Find the following piece of code in your blogs Html : (Click Ctrl and F for a search bar to help find the code - More Info)

</body>

Step 3. Copy And Paste The Following Code Directly Below / Under </body>

<script src='http://hosting.gmodules.com/ig/gadgets/file/105066904960012479556/nccode.js' type='text/javascript'/><a href="http://www.spiceupyourblog.com">Best Blogger Tips</a>

-To add an image to a comment wrap it in [im][/im] like this :

[im]Image URL Here[/im]

-To Change Color Of Text In Comment Wrap It In [co="color"][/co] Like This :

[co="red"]Comment Text Here[/co] - Change Red To The Color You Want.

-To Add Marquee Text Wrap It In [ma][/ma] Like This :

[ma]Comment Text[/ma]

Add Message Above Comment Form


You will want to let your readers know the options so below i will show you how to add a message above the comment form.You can see the message we are adding on the demo.

Step 1. In your Blogger Dashboard click > Design > Edit Html > Expand Widget Templates :


Step 2. Find the following piece of code in your blogs Html : (Click Ctrl and F for a search bar to help find the code - More Info)

<p><data:blogCommentMessage/></p>

Step 3. Copy And Paste The Code Below Directly After <p><data:blogCommentMessage/></p>

<a href='http://www.spiceupyourblog.com'><img alt='Best Blogger Tips' src='https://blogger.googleusercontent.com/img/b/R29vZ2xl/AVvXsEj-IlJVzvSCVVSsiCqqQ5Bn4soziCBcd7DetVFsPvbjCMRJ136yeOqY41CdMZtj3Bmb2_OwWRCin7zuIs-dxw9tyc2fitpdO8ZFi2IccLjOnhdWkFxtY-8y6mryCktW5nJpQbhnIa-_1ZaB/s1600/best+blogger+tips.png'/></a><b>Comment Options -</b> You Can Add Images, Colored Text And Marquee Text To Your Comment.<br/><br/><b>Image -</b> [im]Image URL Here[/im]<br/><b>Colors - </b>[co="red"]Comment Text Here[/co] - Change Red To The Color You Want.<br/><b>Marquee -</b> [ma]Comment Text[/ma]<br/><b>Get This -</b> <a href="http://www.spiceupyourblog.com/2010/12/images-colored-text-blogger-comments.html" target="_blank">Blogger Comment Script</a><br/>

Save Your Template and your readers will now know all the options they have.


guest blog postAuthor - Macro is a Blogger And Designer, he created this script and wanted to share with Spice Up Your Blog Readers.You can find Macro on his Blog.


sexta-feira, 3 de dezembro de 2010

Add Facebook Like Button To Blogger Comments

One of the features i have seen added to comments on Wordpress blogs recently is the Facebook like button.This is a quiet clever addition to the comments as the like button only takes a second to click and if a reader is leaving a comment they obviously do like or have an opinion on the post making them more likely to share your post with their facebook friends.So in this post i will show you how to add a Facebook like icon to the Comments on your Blogger Blog.Adding the Like Button to let readers Share On Facebook is easy and it actually fits perfectly above the comment form.So lets look at the Screenshot and Live demo.

Screenshot :

facebook like in blogger comments

Live Demo - Click To See The Live Demo : Facebook Like In Comments

OK lets add this cool feature to your blog.

Add Facebook Like Button To Blogger Comments


Step 1. In your Blogger Dashboard click > Design > Edit Html > Expand Widget Templates :


Step 2. Find the following piece of code in your blogs Html : (Click Ctrl and F for a search bar to help find the code - More Info)

<data:postCommentMsg/>

Important - This code will be in your template more than once, you need to find the code wrapped in heading tags (Example - h2, h3, h4).So it will look similar to this :

<h4 id='comment-post-message'><data:postCommentMsg/></h4>

Step 3. Copy And Paste The Code Below Directly After <data:postCommentMsg/>

<a href='http://www.spiceupyourblog.com'><img alt='Best Blogger Tips' src='https://blogger.googleusercontent.com/img/b/R29vZ2xl/AVvXsEj-IlJVzvSCVVSsiCqqQ5Bn4soziCBcd7DetVFsPvbjCMRJ136yeOqY41CdMZtj3Bmb2_OwWRCin7zuIs-dxw9tyc2fitpdO8ZFi2IccLjOnhdWkFxtY-8y6mryCktW5nJpQbhnIa-_1ZaB/s1600/best+blogger+tips.png'/></a><br/><iframe allowTransparency='true' expr:src='&quot;http://www.facebook.com/plugins/like.php?href=&quot; + data:post.url + &quot;&amp;layout=standard&amp;show_faces=false&amp;width=100&amp;action=like&amp;font=arial&amp;colorscheme=light&quot;' frameborder='0' scrolling='no' style='border:none; overflow:hidden; width:450px; height:40px;'/>

It will now look like this :

<h4 id='comment-post-message'><data:postCommentMsg/></h4><br/><a href='http://www.spiceupyourblog.com'><img alt='Best Blogger Tips' src='https://blogger.googleusercontent.com/img/b/R29vZ2xl/AVvXsEj-IlJVzvSCVVSsiCqqQ5Bn4soziCBcd7DetVFsPvbjCMRJ136yeOqY41CdMZtj3Bmb2_OwWRCin7zuIs-dxw9tyc2fitpdO8ZFi2IccLjOnhdWkFxtY-8y6mryCktW5nJpQbhnIa-_1ZaB/s1600/best+blogger+tips.png'/></a><iframe allowTransparency='true' expr:src='&quot;http://www.facebook.com/plugins/like.php?href=&quot; + data:post.url + &quot;&amp;layout=standard&amp;show_faces=false&amp;width=100&amp;action=like&amp;font=arial&amp;colorscheme=light&quot;' frameborder='0' scrolling='no' style='border:none; overflow:hidden; width:450px; height:40px;'/>

Step 4. OK with the code in place you can save your Blogger Template and check out your comments with Facebook Like Icon Button.

You can also add a nice image in that section instead of the post a comment test - Replace post a comment with an image.Make sure to check out more of our Social Media Tips and Blog Design Posts.

Drop Your Comments, Views And Questions Below.